
Zone Based Exploration
Let your tables to do the walking

What do you do when your players are exploring an area that is large and complex enough that the effort spent mapping it isn’t worth the payoff? Why map out and key a whole ruined city if they are realistically only going to explore third of it at most. But what third? Will that contain anything related to their quest goals?
One way to handle it is to Quantum Ogre (whichever door you choose has the ogre encounter behind it) the exploration. i.e. the bit they explore contains the bits you want them to find. But this feels railroady and could lead to problems if they decide to retreat from what they’re presented with and explore elsewhere, essentially going off the edge of your railroady quantum map by doubling back - at some point you’ll be presenting the same encounter again and if they beat a retreat to try another street, presenting the same encounter a third time will likely break the illusion of choice.
I’ve been reading a game called Dungeon World recently and I really liked some of the ‘moves’ in the game.
I saw a discussion of a ‘Labyrinth move’ for running a maze as an abstract challenge and figured this could apply to my ruined city with a few tweaks, whilst also incorporating my beloved OSR style tables so I could improvise encounters and locations too.
The move discussed here is as follows:
Whenever you navigate a labyrinth without a map, Roll +WIS.
On a 6-, the GM will tell you what happens
On a 7-9, gain 1 hold and expose yourself to the dangers of the labyrinth.
On a 10+, gain 1 hold or gain 2 hold and expose yourself to the dangers of the labyrinth.
At any time, spend 1 hold to perform the move Discover a Room in a Labyrinth.
At any time, spend 1 hold to return to the entrance to the labyrinth
At any time, spend 3 hold to reach the other end of the labyrinth, be it the exit you want, or the key item from inside.
This looked like something I could incorporate into the Frankenstein set of rules I was using in my hexcrawl game.
For context, my players are going to explore the ruined city of Kerymnaar, razed during the War of The Seven Citadels thousands of years ago, haunted by elven ghosts and demonic remnants of Hellgate Keeps forces. They have been told that in the centre of the city is a Hamadryad who has important quest information for them - the location of the lost tomb that is the Night Hags lair. What they don’t know is that she will only exchange it if they retrieve her Thyrsus, a holy relic of Mielikki stolen by kobold servants of a green dragon that lairs in the ruins.
For exploring the ruin, I adapted the Dungeon World move and came up with this exploration system.
Exploring Kerymnaar
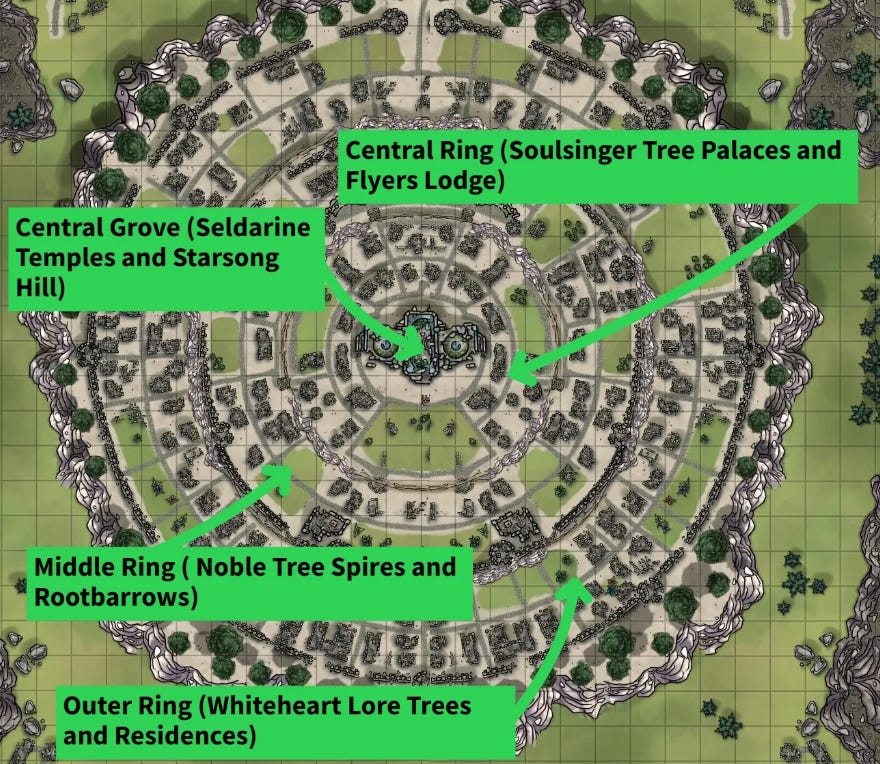
I divided the city into three rings and a central grove. This was the extent of my mapping work. Nice and simple! No keying required beyond the zones.
There are 4 factions in the ruins:
The Hamadryad Solanacia, located in the central grove.
The Blue Bear Uthgardt - a corrupted tribe of barbarians, led by a Night Hag who masquerades as their shaman. Searching the ruins for elven artifacts.
The Blood Abbey gnolls - followers of Lachrymose, the Abbess of Blood and Fangs. Searching the ruins for demonic lore for their mistress.
Greenspit Kobolds, minions of the Green Dragon wyrmling Caustrix, pillaging the ruins for Caustrix’s hoard and have stolen the Thyrsus
These would flavour my tables and influence a maguffin hunt scenario once the characters found Solanacia.
Exploration rules
Whenever you navigate the ruin without a map, Roll Intelligence+Investigation.
On a 11-, the DM will tell you what happens
On a 12-20, gain 1 Exploration Point and roll on the Area Encounter table.
On a 20+, gain 2 Exploration Points and roll on the Area Encounter Table..
When rolling to navigate, spend 1 Exploration Point to **Discover a Location of Interest - roll on the Area Location Table
Instead of rolling to navigate, spend 1 Exploration Point to return to the edge of the ruins and a safe area to camp - your exploration points reset to zero.
When rolling to navigate, spend 3 Exploration Points to move to the next area (Outer-Middle-Inner-Central Grove).
Each area was given a pair of exploration tables, one for encounters and one for locations. These were pretty easy to put together - the encounters were a mix of ones pillaged from other dungeon encounter tables and my own forest random encounters, flavoured toward the factions in the ruin. The locations were take from the Forgotten Realms wiki and various High Forest D&D sources as well as dungeon dressing tables from Raging Swan Press.
Kerymnaar Exploration Tables
Outer Ring: Residences & Whiteheart Lore Trees
Encounters (d10)
A patrol of Blue Bear Uthgardt warriors, seeking relics and eager for a fight.
A pack of hyenas, scavenging among the ruins, accompanied by a lone gnoll scout.
A group of kobolds arguing over stolen elven trinkets, unaware of your presence.
A skeletal shadow with stag horns watches from afar, then vanishes.
A cluster of Whiteheart Lore Trees, their bark inscribed with lost elven knowledge - secrets & clues.
A pit trap, covered with vines, leading into a forgotten elven cellar containing a lost treasure.
An ancient elven apparition reenacting a festival dance from the Festival of Starlight, oblivious to its surroundings.
A storm of whispering voices erupts, recounting tales of the war against the Dlardrageths.
A swarm of Fey-touched insects bursts from a shattered statue, biting and cursing those nearby. Roll again on this table using a d6.
A ruined plaza where gnoll scavengers and kobolds clash over a minor artifact.
Locations (d10)
The Broken Fountain - A dry elven fountain, overgrown with moss, carved with reliefs of the Seldarine.
Lorekeeper’s Hollow - A ruined scholar’s retreat contains a cache filled with decaying elven scrolls.
The Stag Gate - A shattered archway with an enchanted stag relief that occasionally moves.
An abandoned Uthgardt camp with crude totems and symbols of the Blue Bear tribe - signs of a demonic summoning.
A collapsed townhouse with a hidden cellar storing elven wine and ritual relics.
A ruined garden where enchanted flowers still bloom, untouched by time - the party may find ritual components here.
A moss-covered elven statue that whispers warnings in Sylvan when approached.
Uthgardt Camp - A fortified ruin occupied by a band of Blue Bear Uthgardt serving Hagathara Rattleclaw, they are led by a corrupt Shaman and his demon servant.
An overgrown shrine to Rillithane Rallathil, partially defaced by looters but still radiating power.
A demonic rift, shimmering faintly, that pulses with demonic magic at night.
Middle Ring: Noble Treespires & Rootbarrow Crypts
Encounters (d10)
A squad of demon-possessed gnolls marking territory with bloody abyssal graffiti, led by a flind.
A spectral elven warrior locked in an endless duel with an unseen foe.
A ghostly lamentation echoes from a crypt, pleading for release 1-3 it is a benign spirit, 4-6 it is a wraith attracting prey.
A group of kobolds carrying a heavy relic, struggling under its weight.
A swarm of demons clawing through the ruins, remnants of the Seven Citadels War.
A cursed elven mirror reflecting disturbing, prophetic visions.
A pit of shifting roots, attempting to entangle the unwary. The roots are directed by a a fae spirit.
A magical ward flares to life, launching spectral arrows at intruders. Roll again on this table using a d6.
A tree spire crackling with residual arcane energy, creating a zone of wild magic effects.
The eerie sound of wings—giant eagles scouting from above.
Locations (d10)
The Forgotten Spire - A noble elven home, its upper levels crumbling, its ground floor intact.
The Weeping Crypt - A noble tomb, its entrance smeared with claw marks and blood.
The Whispering Hall - An elven assembly chamber, its murals depicting the city’s last days.
A shrine to Corellon, its magical defenses still partially active.
A hidden tunnel leading to the kobold lair beneath the ruins.
The Kobold Warren - A labyrinth of tunnels leading to Caustrix’s lair.
A sacred glade where animated elven statues stand as eternal sentinels.
A giant eagle’s abandoned nest, filled with scavenged treasures.
The Gloaming Pools - Reflective pools showing glimpses of the past.
A fungal grove where spores cause vivid hallucinations of ancient Kerymnaar.
Inner Ring: Soulsinger Palaces & Flyers’ Lodge
Encounters (d10)
A pack of gnolls torturing a captured giant eagle.
A specter of an elven bard, singing of Kerymnaar’s last stand.
A group of kobolds dragging a bound captive toward their lair.
A band of dretches feasting on ancient elven bones.
A collapsing structure, threatening to bury intruders beneath rubble.
A wandering Shadar-kai hunting band, seeing all non-elves as prey.
A black-robed shadow emissary of Hagathara Rattleclaw, searching for something.
A cursed blade, wedged into a stone, whispering promises of power.
A sudden, unnatural storm engulfing the area in darkness. Roll again on this table using a d6.
A ruin where time moves strangely, causing visions of the past.
Locations (d10)
The Flyers’ Lodge - A grand ruin where elves once trained giant eagles.
The Veiled Hall - A shattered council chamber filled with frozen specters.
The Echoing Stair - A staircase leading into the depths, where whispers grow louder.
The Songstone Plaza - An ancient amphitheater, still resonating with forgotten magic.
A desecrated temple where demons once held court.
The Hollow Crown - A broken tower where shadows move of their own will.
The Cradle of Leaves - A grove where the dead still tend to the living plants.
The Blood Abbey stronghold - A fortified ruin claimed by Lachrymose’s forces and dedicated to Yeenoghu - demons and gnolls are here.
A Feywild bloom spreading aggressive magical vines through the ruins.
A spectral battlefield where elves and demons still clash in endless war.
Disastrous Events (11- on Investigation)
A faction adds D4 to their faction clock (if the party has not reached the central grove, roll twice on the area random encounter chart and apply both results)
A deadly trap is sprung, sealing the party in a collapsing ruin - run a chase sequence escaping the collapse.
A massive demon stirs, sensing their intrusion - chase scene with a Goristro smashing through buildings like godzilla.
A magical storm tears through the area - skill challenge to seek cover and avoid effects
The Feywild portal surges, causing massive changes to reality - weird effects with gravity, light, sound and feywild encounter.
A wild magic flare warps the party’s bodies for 24 hours - roll on expanded reincarnatespel table for new race for each character
The undead rise en masse, hunting intruders - run chase involving wights, shadows, spectres, etc
A faction launches a coordinated ambush - gnolls/kobolds/barbarians
The earth trembles, opening a chasm beneath them - drop them in a 5 room dungeon and take some damage (use donjon)
They witness a vision of Kerymnaar’s destruction at the hands of Aliisza Dlardrageth—too real to be a memory.
Central Grove - Seldarine Temple and Sacred Oaks
On arrival here, the following event occurs:
The Hamadryad Solanacia makes her home here. She has been entrusted with rewilding the ruins and reviving the ancient trees that were warped, slain or corrupted during the Seven Citadels War.
To this end, she was entrusted with a sacred Thyrsus (a druid staff) by the goddess Mielikki. Unfortunately, the kobolds serving the green wyrmling Caustrix have stolen the Thyrsus and it adorns the dragons lair.
She will provide the players with the information they seek in return for them retrieving her Thyrsus.
Both the Gnolls and the Uthgardt have interrogated captured kobolds by this point and are actively searching for the lair.
Map of Kerymnaar
Solanacia presents the characters with a map of the Kerymnaar ruins.
When they spend an exploration point in each area, allow them to select the location from the tables rather than rolling.
It now costs only 2 exploration points to move to a new area.
Faction Clocks
Once Solanacia gives the characters their quest to retrieve the Thyrsus, roll a D6 for each faction every exploration turn. On a 4+ the clock increases by 1 check.
Hagathara Rattleclaw and Blue Bear Uthgardt
If filled the Uthgardt raid the lair of Caustrix and Hagathara Gates to them to retrieve the Thyrsus and then escapes to her lair.
[ ] 1
[ ] 2
[ ] 3
[ ] 4
[ ] 5
Lachrymose and Blood Abbey Gnolls
If filled, the gnolls raid the lair of Caustrix and flee with the Thyrsus to the Blood Abbey
[ ] 1
[ ] 2
[ ] 3
[ ] 4
[ ] 5
Final Touches
I still need to do a bit of prep for a few pieces on the tables - it would be good to have some subtables of relics and a list of tidbits of lore of the city (a la Secrets & Clues from Sly Flourish) but I’m nearly there.
I’ll be sure to report on how the exploration system shakes out in play, but I think it’ll be fun!
Let me know what you think, especially if you have any good suggestions for the exploration tables!
I run an open table game in Glasgow. 😉
This is a great concept! Using the "map" as a puzzle to solve instead of actually mapping the whole thing along with mechanics to eventually solve said puzzle. I might use this in my future game design as well!